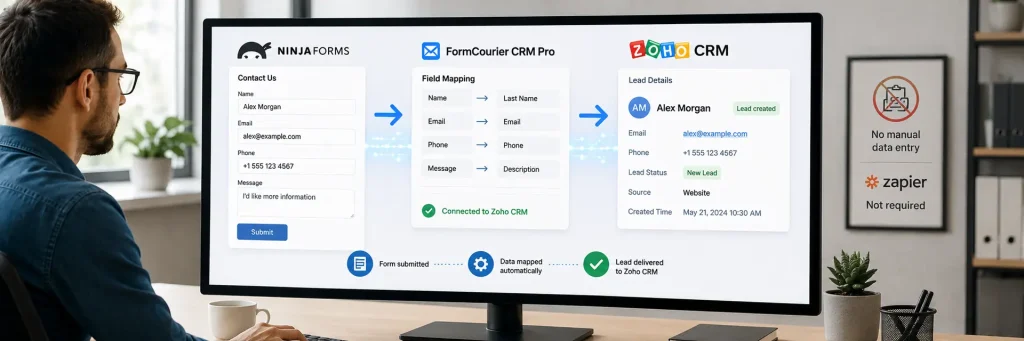
A small business rarely has someone whose full-time job is re-entering form submissions into a CRM. If your site runs on Ninja Forms and your team works out of Zoho CRM, every inquiry that arrives without a direct connection between the two becomes one more manual task squeezed into someone’s already full day.
What a Ninja Forms and Zoho CRM Connection Solves for a Small Business
The appeal of a ninja forms zoho connection isn’t complicated: it removes the step where someone opens an email notification, copies a name, phone number, and message, and pastes them into a new Zoho CRM record. For a business with one or two people handling both the website and the sales pipeline, that copying step adds up fast, and it’s exactly the kind of repetitive task that’s easy to fall behind on during a busy week.
Smaller teams also tend to feel the cost of delay more acutely than larger ones. A lead that sits unprocessed for two days because nobody got around to entering it isn’t a minor inefficiency – for a business relying on a handful of inbound inquiries a month, it can be the difference between a closed deal and a prospect who moved on to a competitor. Automating the handoff between the form and the CRM doesn’t require hiring anyone; it just requires the two systems to talk to each other correctly.
It’s worth being clear about scope here, since it affects how you think about this setup. Ninja Forms still just collects whatever fields you’ve built into your form. Zoho CRM still handles everything that happens once a lead exists – follow-up emails, deal stages, whatever your sales process looks like. The connection’s only job is making sure a submission reaches Zoho CRM accurately, without anyone typing it in twice.
Why Skip Zapier for This Connection
Zapier is a common way to link almost any two apps together, and a ninja forms zapier setup can technically get data from a form into Zoho CRM. But for a small business specifically, the trade-offs are worth weighing before adding another subscription to the stack.
Zapier bills by the number of tasks you run each month, and a lower-tier plan can be used up faster than expected once a site gets a steady trickle of submissions – especially if the same Zapier account is also handling other automations for email or scheduling. For a business watching every recurring cost, that’s an extra line item for something a dedicated integration plugin handles without a separate bill.
There’s also the setup itself. Getting a ninja forms zapier add on working means building a “Zap” from scratch inside Zapier’s own interface: picking a trigger, mapping each field by hand, and testing the chain before trusting it with real leads. That’s a reasonable one-time task for someone comfortable with automation tools, but it’s one more system to learn and maintain alongside the form and the CRM themselves.
None of this means ninja forms and zapier connections are a bad choice in general – for linking many different apps in ad-hoc ways, Zapier remains genuinely useful. But when the only job needed is getting one form into one CRM, a purpose-built plugin like FormCourier CRM Pro generally does that single job with one less moving part and no per-submission cost.
Setting Up Ninja Forms to Zoho CRM Step by Step
Here’s how a working ninja forms zoho crm setup actually gets configured with FormCourier CRM Pro.
1. Select Ninja Forms and your form
In the plugin settings, choose Ninja Forms as the form plugin, then select the specific form whose submissions should reach Zoho CRM. If your site uses several Ninja Forms, only the one selected here gets connected.
2. Connect to Zoho CRM
Zoho CRM authenticates through an OAuth token generated in Zoho’s API console, rather than a simple API key. Enter that token in the plugin settings, then run the built-in connection test – this catches an invalid or expired token immediately, rather than after a real submission has already failed to arrive.

3. Map your fields
Field mapping determines exactly what data lands in Zoho CRM and where. Go through each field your Ninja Forms form collects and assign it explicitly to the matching Zoho field, rather than relying on any automatic guess.
| Ninja Forms field | Zoho CRM field |
|---|---|
| Name | Last Name (required by Zoho) |
| Phone | Phone |
| Message | Description |
Zoho CRM requires a Last Name value on every lead record, so double-check that whatever name field your form collects is mapped there – a form with a single combined “Name” field is one of the more common places this gets missed on a first setup attempt.
4. Choose a delivery mode
FormCourier CRM Pro can send each submission immediately, process it in the background so a visitor isn’t kept waiting on Zoho’s response, or route it through a queue with automatic retries if Zoho’s API happens to be briefly unreachable. A small business with modest submission volume will usually find immediate delivery simple enough; a queue adds a safety net for busier periods.
5. Test before going live
Submit the form with values you’ll easily recognize, then check Zoho CRM to confirm a lead appears with the right name, email, and phone number in the fields you mapped. It’s worth doing this before pointing real traffic at the form, since a mapping mistake is far easier to fix before leads start coming in.
One limitation to keep in mind: FormCourier CRM Pro connects one selected form to one selected CRM at a time. If your site eventually adds a second form that also needs to reach Zoho CRM, it’s configured separately rather than sharing the first connection.
Mapping Ninja Forms Fields to Zoho CRM Data
Beyond the basic contact fields, it’s worth thinking about what else is useful to capture. If your Ninja Forms form asks about a service type, budget range, or how the visitor heard about you, mapping those values to a matching Zoho CRM field – or, where nothing matches exactly, to a custom field you create in Zoho – keeps that context attached to the lead instead of being lost.
This is also where zoho crm ninja forms setups can pass along marketing context, if your team finds it useful. FormCourier CRM Pro can include UTM parameters such as utm_source and utm_campaign alongside the standard fields when that option is enabled, and gclid or fbclid can optionally be added as well – none of these are collected automatically by default, so it’s worth deciding upfront whether a small business actually needs that level of attribution or whether name, email, phone, and message cover what the team will act on.
A practical habit worth adopting: before finalizing your mapping, list every field the form actually asks for and decide, one by one, where each should land in Zoho. It’s a five-minute exercise that prevents the more common failure mode – a field silently going unmapped and its data simply never reaching the CRM at all.
Testing and Verifying the Integration
A connection that works on day one is worth checking again periodically, particularly after editing the form, adjusting field mapping, or regenerating your Zoho API token – any of these can quietly break a previously working setup without an obvious symptom until a lead goes missing.
The most reliable check is a deliberate test submission with recognizable values, confirmed against the resulting record in Zoho CRM. If a submission doesn’t show up, start with the connection test first, since an expired token is the most frequent cause; from there, the plugin’s logs and diagnostic information will usually point to whether the problem was authentication, a missing required field, or something else. If background processing or a queue is in use, check the queue’s status before assuming a delivery failed outright, since it may simply not have processed yet.
 FAQ
FAQ